
8 Go-to Resources About Plumbing In Glasgow
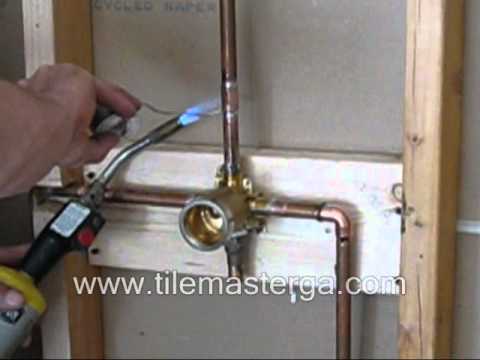
How to Fit Bar Mixer Shower Pipework
This post explains how to 1st repair pipework for a bar mixer shower valve installation.
Introduction
When installing a bar mixer shower valve such as the one revealed, it is initially needed to run hot and cold pipework to the valve.
Setting Up a Bar Mixer Shower Valve
Please see Choosing a shower for your bathroom to find out more on shower types and their viability for your bathroom.
This is done by recessing the pipes within the wall prior to tiling.
In this case study I will be recessing the pipework into a bathroom wall that has currently been dot n dabbed with wetness resistant plasterboard.
Doing the plaster-boarding before the 1st fix pipework makes it much easier to get completely flat & level walls as you don't have the fiddly job of trying to fit the boards around/ over the pipework (to name a few things.).
Walls also require to be square in the corners to allow a good seal (along the edge of the bath in this circumstances.).
Please see Preparing walls for tiling-- reboarding for additional information connecting to this topic.
Technique.
Utilizing Bath to Mark Overflow/Waste and Center of Bath Taps.
The bath is briefly put in position, and the centre line (that goes through the overflow/ waste and the centre of the bath taps) is marked.
This will help us line the shower valve up with the taps for a more visually pleasing surface.
The horizontal level of the bar mixer shower valve is then marked, which is usually around 130cm from the floor. If you are planning https://b3.zcubes.com/v.aspx?mid=5183187&title=how-to-solve-issues-with-plumber-glasgow to fit a bar mixer shower with a fixed riser and shower head, you will need to make sure that this height allows you to fit the shower in without it striking the ceiling.
Correct Shower HeightIncorrect Shower Height.
Next the pipe centres are marked with vertical lines at 150mm centres i.e. 75mm away from the centre line in both instructions. This is where the pipework will range from the valve, down the wall and link to the pipework under the bath.
The majority of bar mixer shower valves accept pipework at 150mm centres as this is considered standard-- if your specific model has a various pipe centre worth, then you require to show this at the marking out phase.
A location to be chased out is then marked (into which the pipes can be recessed beneith the surface of the plasterboard.).
The approximate height of the bath rim is also marked at this stage.
Correct Shower Height.
The locations to be chased out are then chased after out using a precise saw, ensuring that they extend below the level of the bath rim, which is marked in pencil on the plasterboard.
Here we can see the pipework under the bath that will be extended as much as feed the shower valve.
The hot feed will be run up the left hand channel, and the cold feed will be run up the right-hand man channel.
This is since the hot feed will get in the valve left wing (as we take a look at it) and the cold feed on the right.
This is an industry standard.
Because of this, the pipework under the bath remains in line with this setup.
You can see that the bath waste pipe & trap has likewise been fitted at this time. When the bath was in position, a cross was marked on the flooring through the waste hole in the bottom of the bath to mark the needed area of the bath trap.
Copper Pipework Is Soldered And Then Placed Into The Channels.
2 pieces of 15mm copper pipework are then soldered together with a 90º elbow for each feed, which are then positioned into the channels as revealed.
The horizontal pieces of copper (at the top) will eventually be lowered to enter into the back of the bar mixer valve.
The pipes are held level and square to the wall at 150mm centres (centred on the initial centre line) by a home-made jig which is screwed to the wall momentarily. This is necessary as connecting the shower valve counts on this stage of the work being done properly:.
Pipes Are Held Level And Square To The Wall.
It is necessary the the pipes are recessed far enough into the wall so that the 90º elbow fitting does not protrude out beyond the completed tiled surface area.
This will ensure that it does not interfere with the fitting of the bar mixer shower valve.
Inaccurate Shower PipeworkCorrect Shower Pipework.
The pipes are then secured in location by utilizing either drywall adhesive, rapidset tile adhesive or a sand-cement mix.
If using a mix containing cement, please ensure the pipes are covered in duct tape to avoid the cement from assaulting the copper which could lead to pinholes and leakages establishing gradually.
The mix is pushed in and around the pipes and is utilized to support the cut edges of the plasterboard.
Mix Is Levelled Off Flush With Surface of Plasterboard.
This is then levelled off flush with the surface of the plasterboard, guaranteeing access to the bottom of the pipes is left open so that they can be linked up later on.
Batons are screwed and glued to both walls surrounding the bath, and these will help to take the weight of the bath when it is full of water and/or occupants. This will prevent it from dropping, which can result in broken silicon seals and water ingress issues.
Briefly Position The Bath to Allow For The Pipework To Be Connected.
The bath is then momentarily positioned in position to allow for the pipework to be linked.
The existing hot and cold pipework is linked to the proper pipework in the wall that will feed the shower valve.
Arrangements are also made at this stage to connect the bath taps-- via flexible push fit tap ports in this circumstances.
As with the shower valve, hot is on the left and cold on the right (as you take a look at the tap) so this makes pipework simpler.
Jig Is Removed And Voids Are Filled With Adhesive.
Once the adhesive holding the pipes has gone off and the pipes are securely kept in the right position, the jig can be removed and any staying voids completed with more adhesive.
As the pipework is now connected to the cold and hot provided, stop ends can be seen in location at the ends of the pipes.
The bath is now be set up, and you can see the main silicon seal around the edge of the bath in this picture.
Tanking And Tiling The Walls.
The walls are then tanked and tiled.
Installing a Bar Mixer Shower Valve.

20 Resources That'll Make You Better At Plumbers Glasgow
Discover just how to fit a bath with this expert guide, consisting of detailed guidelines and also video.
Whilst conserving money on your bathroom setup expense may appear a excellent suggestion, suitable a bath is finest entrusted to a professional tradesperson with experience in this sort of job. They will ensure it is fitted and also plumbed properly, so you don't endure any problems further down the line.
You'll find a wide range of bathrooms at VictoriaPlum.com, in all fashion of forms, dimensions and styles to suit your needs. For instance:
Straight baths (either solitary or double finished).
Shower bathrooms (P formed or L designed).
You can discover suitable directions for other bathroom products by clicking the links below:.
Exactly how to fit an acrylic bathroom panel.
Exactly how to fit a wooden bathroom panel.
Exactly how to fit a bathroom screen.
How to fit a bath mixer tap.
How to fit bath taps.
For the objectives of this how-to overview, we'll be considering fitting a straight bath.
What is a straight bathroom?
A straight bathroom is one of the most usual baths you'll find in the UK. Normally built out of acrylic or often steel, it rests on legs which are then concealed by bathroom panels. Touches are found either at one end (in a solitary ended bathroom) or on one side (in a dual ended bath).
Orchard square side solitary ended straight bathroom.
The Orchard square side bath is a example of straight, solitary ended bathroom.
Before you do anything.
Always unload your bath right away after shipment. Check for any kind of damages or faults as it's much better to discover them now, as opposed to during setup.
Always shut off your water at the keys before attempting any kind of DIY in the washroom.
Tools you'll require:.
Flexible wrench.
Electric drill with hole cutter.
Hack saw.
Pencil.
Pipeline cutter.
Sealant weapon.
Level.
Standard screwdrivers.
Tape measure.
Check you have the following:.
Usually supplied with bathroom:.
Tub.
Flexible feet.
Wall fixing brackets.
Handles (if provided).
May need to purchase separately:.
Bath waste.
Bath tap( s).
Will certainly require to buy individually:.
Silicone sealant.
Time to complete:.
1 day.
How much will a Tradesperson typically bill?
₤ 190-- ₤ 220 ( rate might vary-- learn even more regarding restroom suitable prices).
Fitting your straight bath.
At Victoria Plum, you'll find the majority of our straight baths are crafted from premium quality, acrylic that's warm to the touch, as well as has superb influence and also scratch-resistance for outstanding resilience.
The following video clip and also guidelines are for fitting a straight bath:.
Here is just how to fit a bathroom.
Action 1.
Put your bath on a degree surface area.
Removing the installations box.
Step 2.
Eliminate the installations box ( normally connected to the bottom of the bathroom) and check you have all the parts.
Inspecting all components.
Action 3.
It's finest to get rid of the protective cardboard as well as plastic movie at this phase (although you can select to maintain them in position up until you've fitted the legs, to aid secure the bathroom). Check your bathroom carefully for any type of problems and also inspect the colour suit is acceptable to your suite and also any kind of panels.
If you're unhappy with your bathroom at this phase, please get in touch with our Client Care Group using LiveChat right away ( giving you purchased the bathroom from Victoria Plum). Any refixing prices, cases for incorrect colour suit, and/or any other faults AFTER setup, will certainly not be approved.
Eliminating product packaging.
Tip 4.
If the bath has handles, fit them currently.
Attaching brackets.
Tip 5.
Connect the brackets to the bottom of the bathroom and also repair the legs into the corresponding holes.
Dealing with bathroom legs.
Action 6.
Fit the centre leg bracket and also the leg itself. You should have all of the legs at approximately the same height prior to standing the bathroom upright.
Examining legs are just the same elevation.
Action 7.
Area the bath against the wall surface and examine that it's level, changing the elevation of the legs as needed.
Useful hint: Take Plumbers Scotland a couple of wooden battens up to 60mm broad and also stand the bath on these to help secure your floor. If laid on floorboards, these ought to be at 90 degrees to the joists.
Inspecting the bathroom is level.
Tip 8.
Relocate the bath far from the wall surface as well as connect the wall surface fixing braces to the side of the bath.
Connecting the wall surface fixing brackets.
Tip 9.
It's currently time to fit the bathroom faucets. Look into our "how to fit bathroom faucets" overview for directions.
Suitable bathroom faucets.
Step 10.
Protect the bath waste in position making use of the washers provided. A slim grain of silicone can aid maintain the seal watertight for longer.
Safeguarding the bathroom waste.
Action 11.
Fix the overflow right into setting.
Dealing with the overflow in place.
Action 12.
As soon as fitted, place the bathroom versus the wall surface and also protect it making use of the wall brackets connected previously.
Take care of making use of the wall surface braces.
Step 13.
Your bath is currently prepared to be plumbed in and also secured. We advise looking for the aid of a specialist for this.
Bath prepared to be plumbed in and also secured.
Congratulations, you've currently fitted your straight bath.
Whilst DIY can be a good way to save money and time, you ought to always work with a certified expert to plumb as well as totally install your items. The instructions over are simply a overview to suitable your new bathroom and should not be made use of to attempt complete pipes and also setup.
If you wish to print these instructions off, see our printer-friendly variation listed below.
Put your bath on a degree surface.
Get rid of the installations box ( typically affixed to the underside of the bath) as well as check you have all the elements.
It's ideal to get rid of the safety cardboard and plastic film at this stage (although you can choose to maintain them in place up until you've fitted the legs, to help shield the bathroom). Examine your bathroom very carefully for any type of damages and inspect the colour suit serves to your collection and also any kind of panels.
If the bathroom has takes care of, fit them now.
Connect the brackets to the underside of the bathroom as well as deal with the legs right into the matching holes.
Fit the centre leg brace and also the leg itself. You must have every one of the legs at about the very same elevation before standing the bath upright.
Place the bathroom against the wall surface and also check that it's level, adjusting the elevation of the legs as required.
Relocate the bath away from the wall as well as attach the wall surface dealing with brackets sideways of the bath.
It's now time to fit the bathroom taps.
Secure the bathroom waste in position utilizing the washers supplied. A slim bead of silicone can help keep the seal watertight for longer.
Take care of the overflow right into placement.

As soon as fitted, position the bathroom against the wall surface as well as protect it using the wall braces connected earlier.
Your bathroom is now ready to be plumbed in as well as secured. We advise looking for the assistance of a expert for this.
